Transportation Management in D365

Hi DAXers,

Believe you people are doing great. I got a lots of request from you for the topic of Transportation Management. So in this blog we will be discussing on Transportation Management in AX7. Like WMS, TMS also have some set ups that needs to be done.

Before we start directly into AX, lets discuss the concept of it. Transportation management is basically the process of adding charges to the customer (for the shipment of the goods) on the basis of few factors like- Weight, Distance etc. and also depends on the carrier (mode of transport) like Truck, Rain, Air etc. So we will set up all these things in AX and will see how it works.

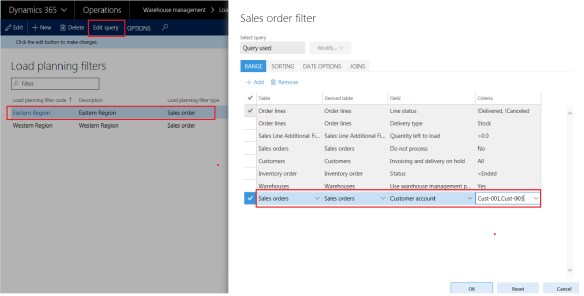
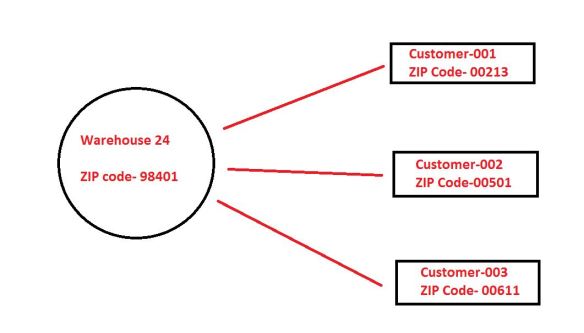
Let me explain you with a scenario, I will be using here in this blog. I will use the concept of ZIP Codes from my warehouse to the customers. And measuring the Zip codes, I will be assigning the Accessorial charges to each customer. Based on the set up done, system will automatically calculate the charges. Now lets get it started.

Warehouse Setup

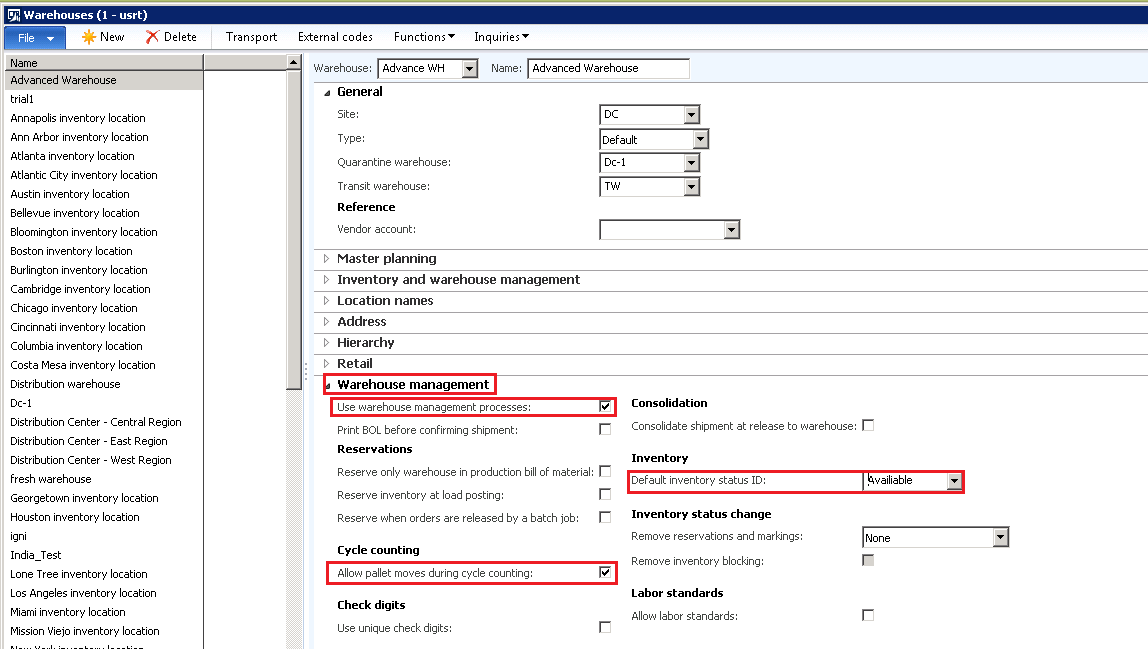
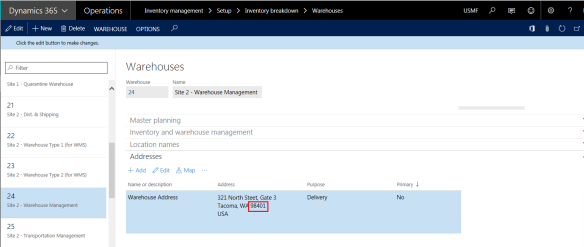
I am taking a Warehouse which is 24 and assigned the Zip code as 98401 in the address (Considering this Warehouse as my Shipping warehouse)
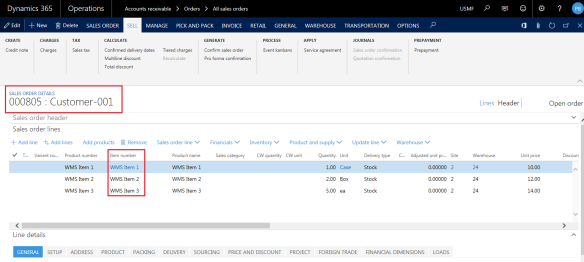
1

Customer Set Up

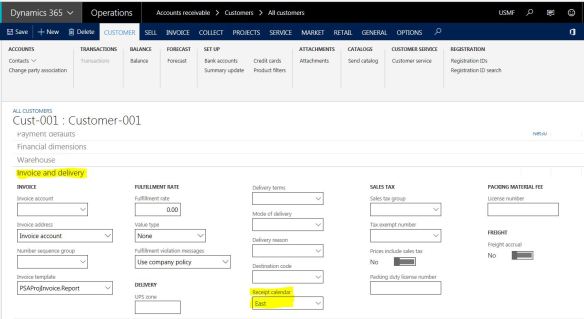
Same like the warehouse, I have assigned the ZIP codes for the customers as well. In my example I will show you for 3 customers.

2
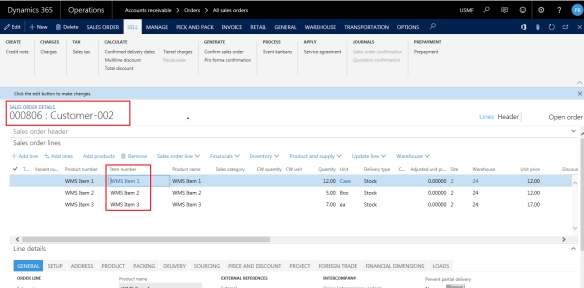
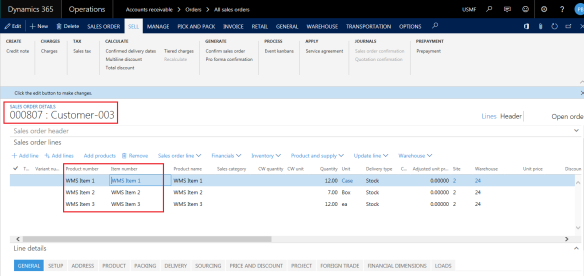
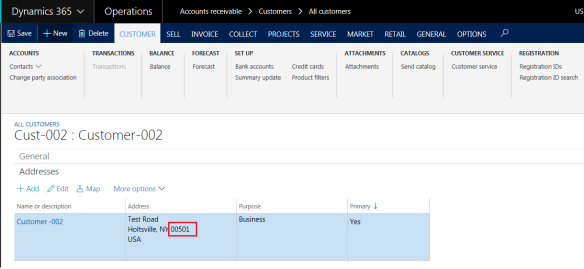
Similarly for Customer-002 and Customer-003, I have assigned two different ZIP Codes. This is how the set up has been done
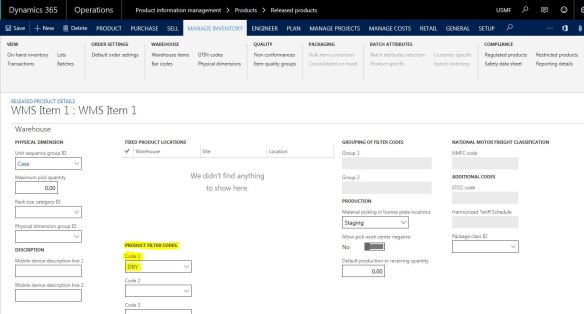
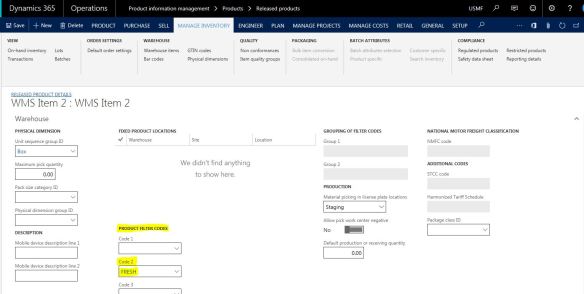
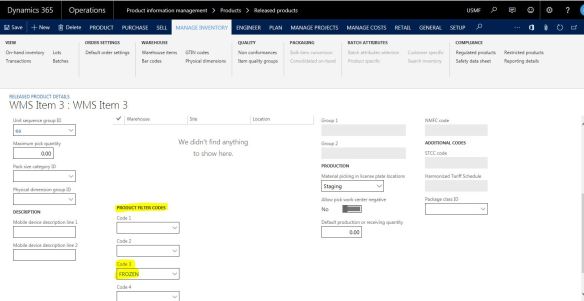
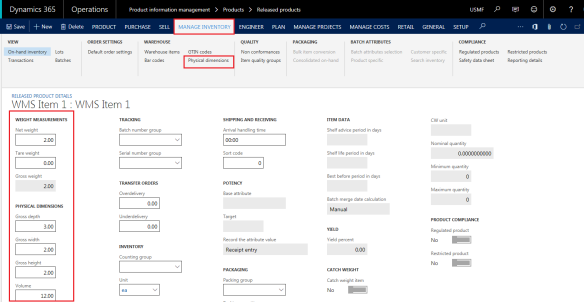
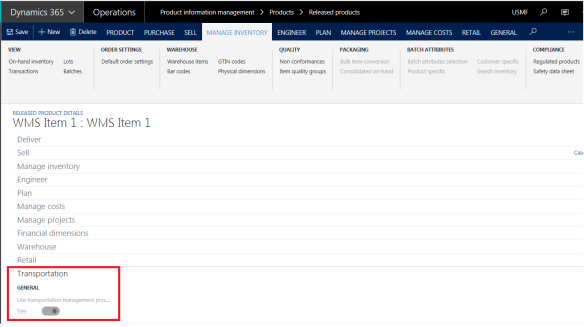
 

3

Item Set Up

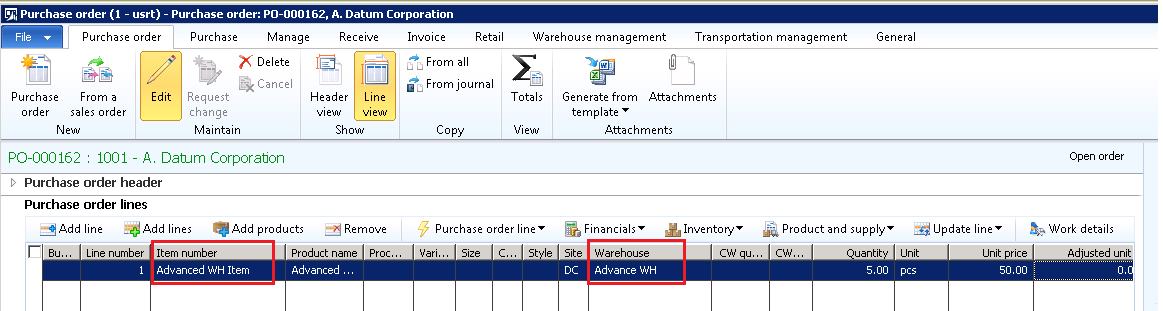
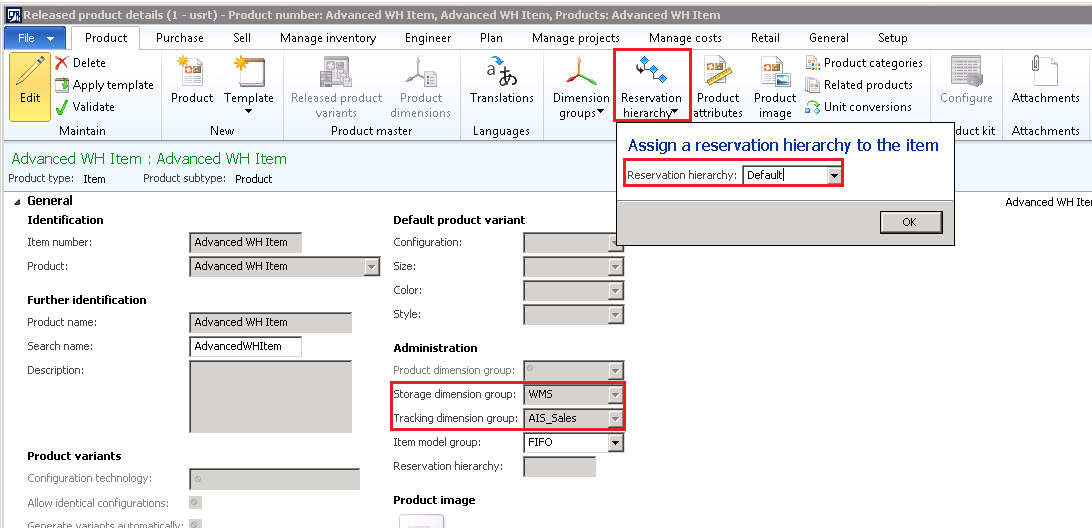
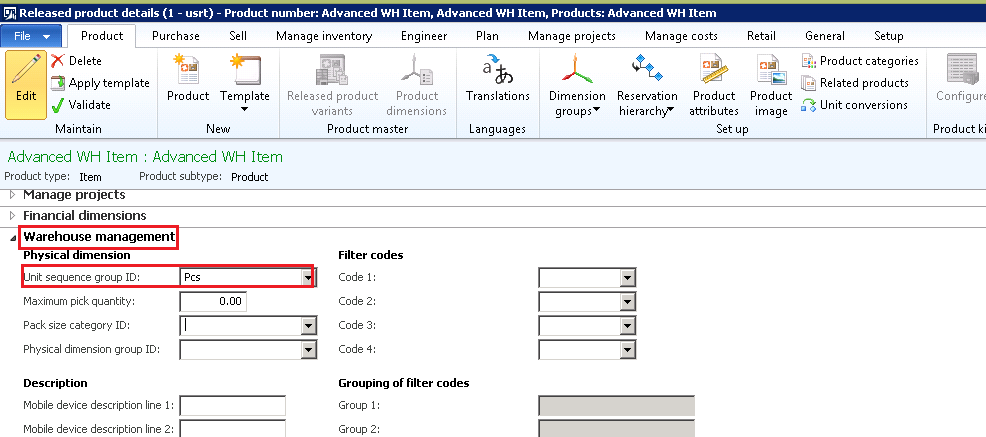
The item that will be used in the Sales Order must have the Transportation management Process parameter checked.

3Modes

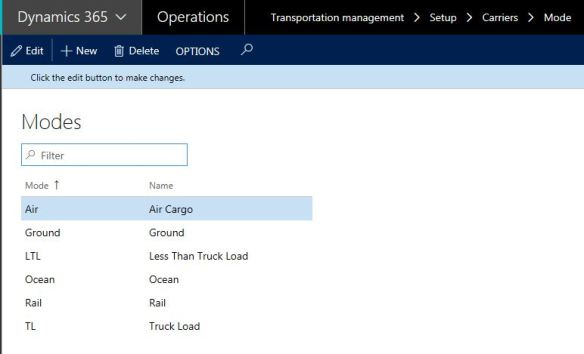
Modes represents the form of delivery that is used for shipment of the goods.

Navigate to: Transportation Management > Set Up > Carriers > Mode

5Shipping Carrier

Shipping Carrier is a coordination between the warehouse and the end customers. In order words it is the physical way by which the goods will be shipped to the customers.

Navigation Path: Transportation management > Set up > Carriers >  Shipping Carriers

4
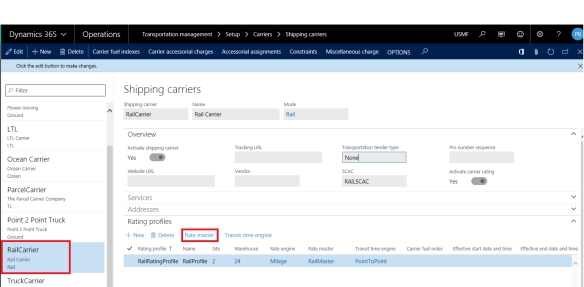
Now when clicked on Rate master, I have added the Origin and Destination PIN code. As explained above, origin was my Warehouse and Destination is my end customer. That means whenever system finds an order between these 2 PCs, this shipping carrier will be considered as one of the options.

5
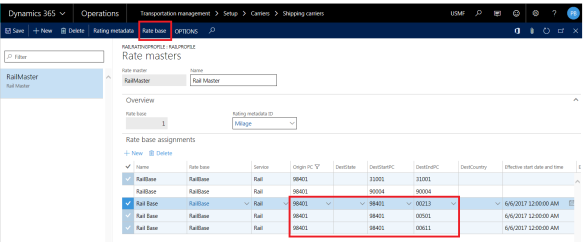
Now from this form click ” Rate Base”. Here we have defined the cost as per mile. So upon the distance between the warehouse and the customer (based on pin code) system will multiply the distance with the rate per mile.

6
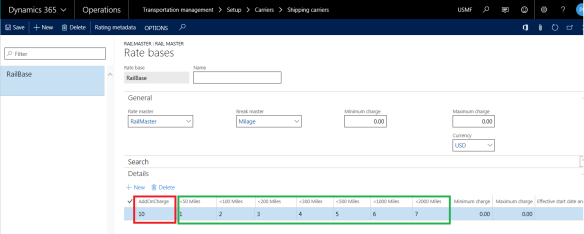
Note: This is the main part from where the calculation will happen. Different range of Miles are coming from the Break Master field where we have defined the value on the basis of per mile. Also we have given Add on Charges as 10 USD which means like Toll charges or Labor charges.


Sales Order Creation and Transportation Charges

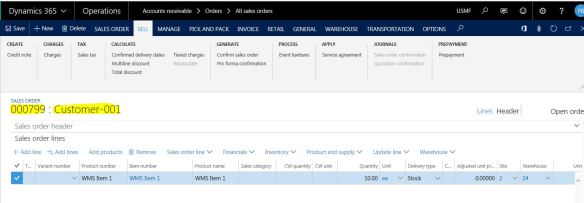
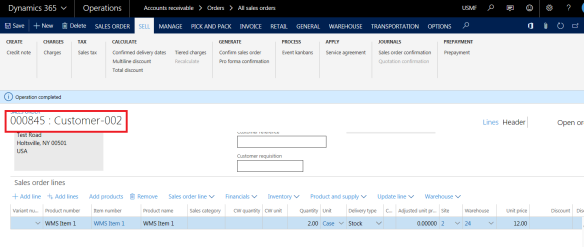
Now once the following Set up has been done, now lets create a Sales Order. I am taking Customer-2 for my Sales Order.

7
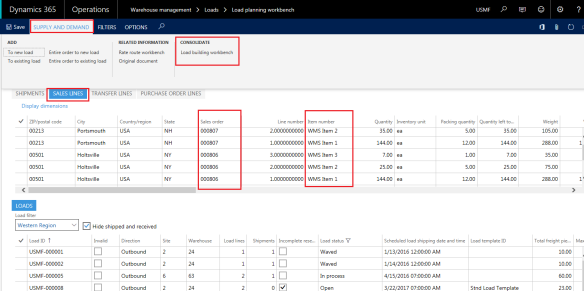
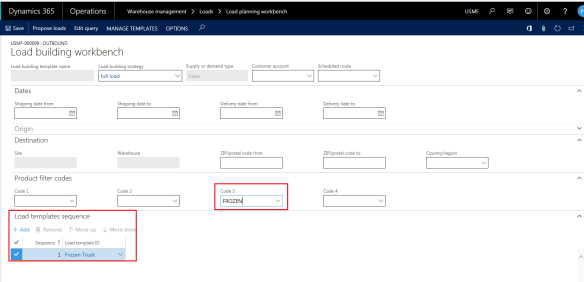
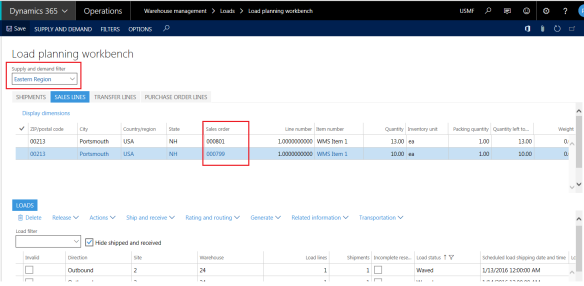
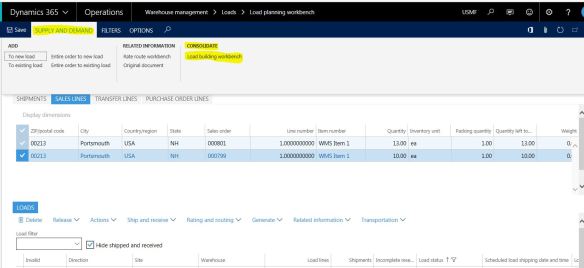
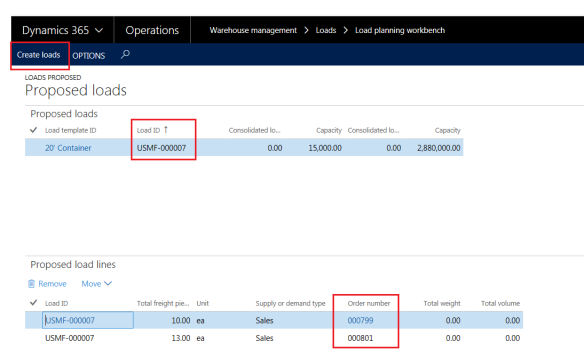
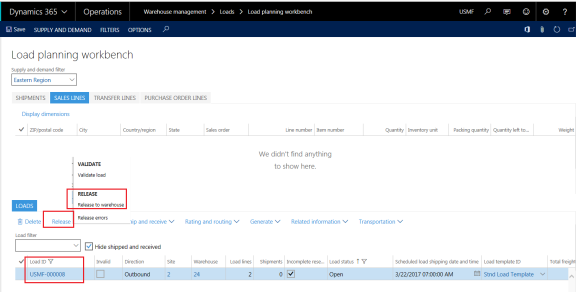
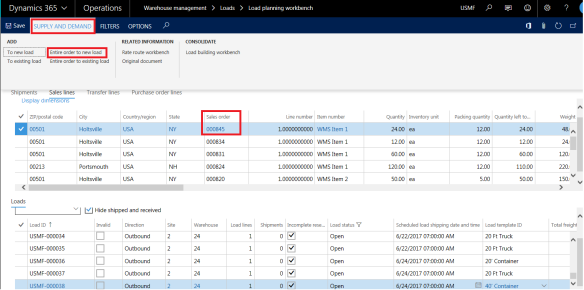
Now coming to the Load Planning Workbench form ( Navigation: Warehouse Management > Load > Load Planning Workbench), creating a New load for my Order.

8
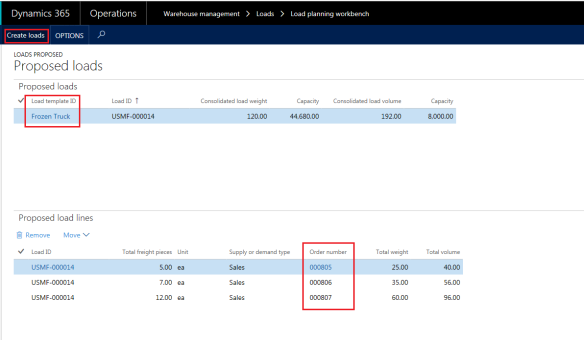
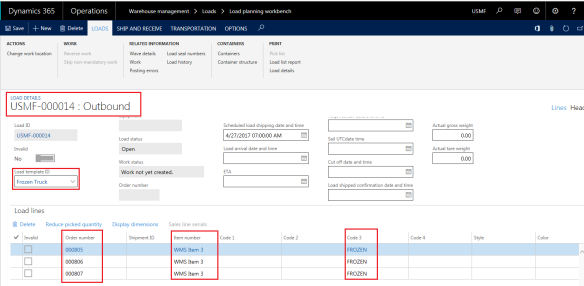
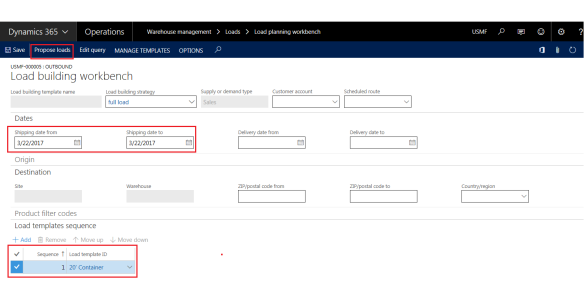
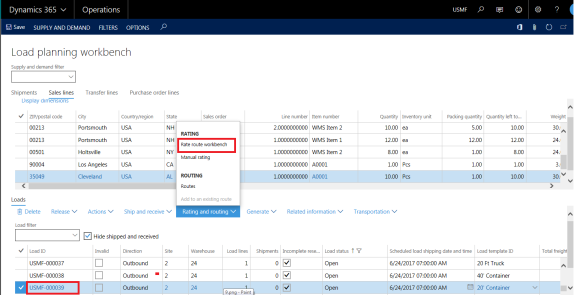
After selecting the Load Template and clicking OK, Load ID got created. Now selecting with the Load ID click on Rate and Routing > Rate Route Workbench

10

In the Rate Route Workbench form, click Rate Shop. Based on the set up of the Shipping Carrier and its Accessorial Assignments, shipping rate will come.

12
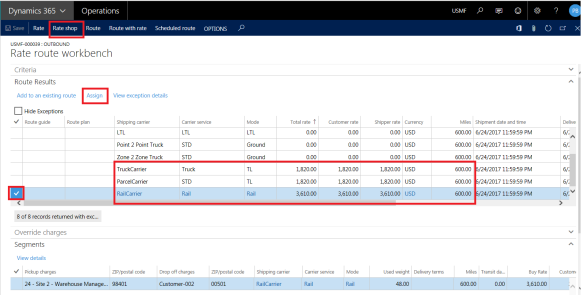
Now here system will automatically display the shipping rate based on the mode of delivery. This lets to compare the price and propose the best convenient way to ship the items. If I ship by Rail carrier then its 3610 USD and if by Truck Rail then its 1820 USD.

I will select the Rail Carrier for example and then will click Assign button. After Assigning the Rail Carrier, Route will get created which will show all the details.

12
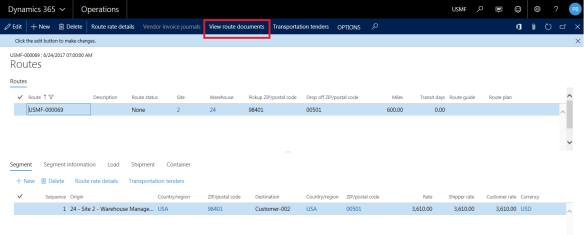
Now if you click on the View Route Document then the detailed report will generate specifying the charges of transportation.

14

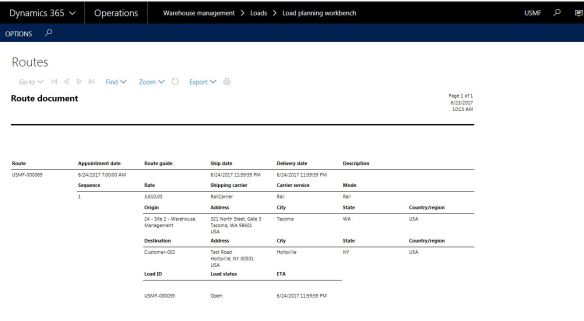
In the Rail carrier the Shipping rate came as 3610 USD. Now Let me explain the calculation from where the 3610 USD came. Here the distance between my warehouse and the customer (based on ZIP code) is 600 miles. So now for Rail carrier if you check then the rate was 6 USD between 501 miles to 1000 miles. So the total cost = 600 * 6= 3600 USD. Along with that we had 10 USD as Add on Charges. So 3600 +10= 3610 USD is the total Transportation charges.

I believe that you have loved this post. Will be back soon with some more interesting blogs and feature of AX. Till then take care and keep DAXing 🙂 🙂 🙂


Truck Loading Process- WMS

Hi DAXers,

Trust all of you are doing well. Lets enhance some more beautiful features of AX in comparison with my last post. Today in this post we will discuss about the Truck Loading process in AX through Dynamics 365.

Before I start, Let me give you an example. Suppose I have 3 sets of Items- Dry Goods ( say Biscuits/Breads), Fresh Goods ( say Vegetables/Milk) and Frozen Goods (say Ice Creams). Again I have 3 customers from Eastern region and 3 customers from my western region w.r.t my Warehouse. Now say I have three trucks for delivery- Normal Truck on which only Dry goods i.e. Biscuits and Breads will get loaded and shipped, Air Condition truck where only vegetables will get loaded and shipped and one Frozen Truck where only Ice Creams will get loaded and shipped. Now in this scenario- I will load only the Dry goods for the customers that come from eastern region into the Normal Truck, will load only the Fresh goods for the customers that come from eastern region into the Air Condition truck and finally will load only the Frozen goods for the eastern region customers into the Frozen truck. In other words, in my Normal truck only Biscuits/Breads will get loaded, in Air condition Truck only Vegetables/Milk will get loaded and in Frozen truck only Ice creams will get loaded. Now lets configure this scenario in the system.

Define Item as Dry, Fresh and Frozen:

Select one item ( WMS Item 1 in our case) and set the Item code as DRY  in Code 1 of Product filter code under the Warehouse  fast tab.

1

Similarly define the Item code as FRESH and FROZEN for the other two items ( WMS Item 2 as FRESH and WMS Item 3 as FROZEN in our case)

2

3

Defining the Dimensions of the Item:

It is very important to define the dimensions of the item. The dimensions of the item will get calculated by the no of quantities and will match with the dimension of the truck ( For example the Volume of each item is 10 and in the order there are 12 quantities. So total volume is 120. But if the total volume of the truck is 100. Then for the remaining 2 items, another truck will get assigned)

Under the Manage Inventory fast tab of the item define the dimensions like Height, Length, Width, Weight and Volume. The same will get reflected into the physical dimensions form also.

4

Note: Similarly define dimensions for the other 2 items ( WMS Item 2 and WMS Item 3 in our case)

Create Sales Orders for the Eastern Region Customers:

In my scenario I have 3 customers: Customer-001, Customer-002 and Customer-003. All of them comes from the Eastern region. I have created 3 Sales Orders for each of them using all the Items

Sales Order 1:

6

Sales Order 2:

7

Sales Order 3:

9

Now coming to the load planning Workbench form ( Warehouse Management > Loads > Load Planning Workbench)- Filtering with eastern region. Under the sales lines tab all the lines from 3 sales orders will come. Now click on the Load Planning Workbench button under the consolidate section.

10

I will show you only for the Frozen Item ( WMS Item 3 i.e. Ice Cream) loading in the Frozen Truck. In the same way you can do it for the DRY Item loading in Normal Truck and FRESH Item loading in the AC truck.

Here in this form happens the magic. I will filter the item here on the basis of the code as FROZEN and assign the FROZEN truck under the Load Template sequence.

11

Note: If you want to do it for the Dry goods then filter with Code1 as DRY or if you want for Fresh goods then filter with Code 2 as FRESH.

Once done click on the Propose Load button at the top. Here you can find that system has only taken the Frozen item i.e. WMS Item 3 (Ice Cream) from 3 different sales order and created only one load. To create a load click on Create Load button.

13

More precisely, showing the load lines for the load that has been created ( All the lines are WMS Item 3 from 3 different Sales orders)

14

I am leaving the DRY and FRESH goods loading for you and am pretty much sure you can practice it and do it 🙂

Lastly I would like to show you the Truck dimensions that I have used.

15

I believe that you must have liked this post. Please feel to connect with me in case of any doubts. You can email me at- parasharb71@gmail.com and also you can comment at my facebook page: https://www.facebook.com/Parashar-Banerjee-DAXing-1322868744468665/?ref=aymt_homepage_panel

See you soon with some more interesting features. Till then keep DAXing 🙂


Warehouse Management System- Consolidation of Load based on Zone

Hi All,

I believe that all of you are doing really awesome and enjoying Dynamics 365. I was really really busy with my project works and so it took long enough time for me to come back here and share my thoughts with some of the most interesting features with you.

I would like to continue and enhance some of the interesting features of WMS through Dynamics 365. I hope that this post will definitely help you in your project works also. So without wasting much time, Let’s get it started. I am pretty sure this post is really interesting.

In this topic we will learn how to consolidate the load of WMS based on the Geographical location of the customers. Let me give you an example: Suppose I have 4 customers ( Customer-001, Customer-002, Customer-003 and Customer-004) .Lets assume that Customer-001 and Customer-003 comes from the Eastern region and Customer-002 and Customer-004 comes from the Western region. Now lets assume that we have only one Truck which gives delivery to all these 4 customers. So its not possible for a single truck to give delivery to the Eastern region as well as the western region on the same day.

We will configure in the system in such a way that the delivery for the Eastern region will happen on Mondays, Wednesday and Friday. And the delivery for the Western region will happen on Tuesdays, Thursdays and Saturdays. So we will consolidate the loads for all the customers from Eastern Region on say Monday and the Truck will give delivery to all the Eastern region customers. After the truck comes back to my warehouse I will load all the orders for the customers from Western region and the Truck will go for the delivery on Tuesday. Like this delivery will happen in every alternative day.

First of all we will create 2 calendars (Organization Administration > Set Up > calendars): One for East and one for West. East calendar will be open for Monday, Wednesday and Friday. West Calendar will open for Tuesday, Thursday and Saturday.

1

Note: Above screenshot is for the East Calendar. Make same for West Calendar but the open days are Tuesday, Thursday and Saturday.

Now attach this East calendar to the customer (under the Invoice and Delivery fast tab), Customer-001 and Customer-003 as these 2 customers come from Eastern region.

2

Note: Similarly attach West Calendar with the customer, Customer-002 and Customer-004.

Now lets create a Sales order with the customer, Customer-001.

3

Under the delivery tab of the Sales order lines- click on the ‘Simulate Delivery dates’ button. This will show you the delivery dates for the eastern region.

4

Note: This Sales Order no is- 000799. Similarly create another Sales order with customer Customer-003. Similarly create 2 more sales orders for the customer, Customer-002 and Customer-004.

So at this point of time we have Four Sales Orders:


Now coming to the Load planning Workbench form ( Warehouse Management > Loads > Load Planning workbench). This place is very important where the filtration on the basis of location will be done.

In the Load Planning Filter I have created two records: Eastern region and Western region. Select eastern region and click on Edit Query. Under Edit Query I have given the respective customers that come from Eastern region that is. Cust-001 and Cust-003

6

Note: Similarly do the same for Customer-002 and Customer-004 for Western region.

Now coming to the Load Planning workbench form, Filtered with the Eastern Region and Only those Sales Orders (000799 and 000801 in our example ) from Eastern region will come.

7

Now select those two orders and click on Load building Workbench button under Supply and Demand tab.

9

Now here filter with the shipping date that you want to ship for the Eastern region customer and then click on Propose Load.

10

A load will get appear with these two Sales orders and click on the Create Load button. This will create the Load actually.

12

You can able to see that the Load has been created. Now select on your created load and click on Release> Release to Warehouse

13

Now the scanning process after this will start and I am not going it in details as you can refer to my post on Outbound process to complete the load for this order.

By the same way you can do it for Western region. I am not showing the Western region process as I am leaving that for you. At any point if you stuck, please feel free to contact me. I can be reached at- parasharb71@gmail.com.

See you soon with a new and interesting post like this. Till then keep DAXing 🙂

Warehouse Management System- Containerization Process

Hi All,

These days we have learnt the WMS processes like Inbound, Outbound, Cycle count and Replenishment. In this post, we will discuss about the Containerization process in WMS. The new Warehouse management system in Microsoft Dynamics AX 2012 R3 introduces the concept of Containers.

By using this feature, you will not only have an overview of the quantity and types of containers that are going to be used for packing prior to the picking of goods, but you’ll also have work created in a way that the work lines are split into quantities that fit the containers. This allows and guides the warehouse workers to pick the items directly into the chosen container.

This blog post describes the necessary setup for containerization and provides an example of a basic automated packing flow.

Wave Template

A wave template is the entry point to the containerization process. To enable containerization, the method should be on the Left side along with a Wave step code. In our example we have given 001 as the code number.

1

Container Types

Container needs to configure in the Containers form . Configure the physical dimensions of containers including tare weight, maximum volume, length, width, and height. In this example we have three different sizes of boxes- Box1, Box2 and Box3.

Navigate to: Warehouse Management > Set up > Containers > Container Type

1

Container Groups

This is the form which groups all the containers. As in our example, we have grouped the boxes- Box 1, Box 2 and Box 3 in one group.

Navigate to: Warehouse Management > Set up > Containers > Container Groups

1

Container Build Template

The container build template is the core setup for this feature, based on which the containerization process is performed.

Navigate to: Warehouse Management > Set up > Containers > Container Build Template.

This is the place where Wave set up code is set. Base query types should be the- Sales Allocation Lines and Container packing strategy should be the- Pack into all the open containers. Make sure to check the Allow split picks check box checked.

1

Work Template

Few set ups are required in the Work Template form. This is the place where works will get break according to the boxes.

Navigate to: Warehouse Management > Set up > Work > Work Templates

Under the Work templates form, click the Edit query button and then move to sorting tab. Under sorting add the two field- Container ID and Highest Parent Container ID.

1

Once these two fields are added, click OK and close the form. Click on Work Breaks button. Make sure to check the Group by Field check box as checked for the Container ID field.

1

Item Dimension

Item dimensions are mandatory that needs to be filled so that the system will compare the size of the box along with the item and then put the items into the respective boxes.

Navigate to: Product Information Management > Common > Released Product > Select the respective Product > Edit

Under the manage inventory tab, click the Physical Dimensions to enter the dimensions of the item.

Untitled

Untitled

Now all the set ups has been done. Now its time to create a sales order and see the Containerization effect. Follow the below steps.

  1. Create a Sales order with the same item with which the dimensions has been done.

Untitled

2. Reserve the items and Release it to the warehouse.

Untitled

3. Go to the Work Details form and click the Shipment button.

Untitled

4. In the Shipment details form, go to the Transportation tab and click Container structure.

Untitled

5. In the container structure, system will show you the list of the containers system has taken for the items to pack.

Untitled

So, this is the process by which Items are being configured in to the boxes and sent to the customer. In this case 3 quantities are set into Box 1 and for the remaining 1 quantity, system took the smallest box and thus put into the Box3.

Thanks for reading the whole WMS processes! We look forward to your feedback on this. new feature. I will be back with some other interesting features in AX 2012. Till then Keep DAXing 🙂 🙂 🙂

Warehouse Management System- Cycle Count Process

Hi DAXers,

As promised, I am back with the Cycle Count process in this post. Cycle counting is a warehouse process that user can use to audit on-hand inventory items.

Cycle Count Process by using WMS (Mobile Device) can be done on the basis of two types –

  1. Cycle Count work by Location
  2. Cycle count work by Item

There are few set ups required for the Cycle count process. Lets have a look into them-

Warehouse Set Up

User needs to enable workers to move pallets during a cycle count, on the Warehouse management Fast Tab, select the Allow pallet moves during cycle counting check box.

Navigate to: Warehouse Management > Set up > Warehouse Set up > Warehouses

1

Locations Profiles

User needs to enable cycle counting for locations. In the Location profiles form, select the Allow cycle counting box to allow cycle counting for the warehouse location.

Navigate to: Warehouse Management > Set up > Warehouse Set up > Location Profiles

1

Warehouse Management Parameters

Set up parameters for cycle counting. In the Warehouse management parameters form, specify the default adjustment type code, work class ID, and work priority for cycle counting.

Navigate to: Warehouse Management > Set up > Warehouse Management Parameters

1

Mobile Device Menu Items

Mobile device needs to be set for the particular user so that the user can use his/her mobile device to perform the work For Replenishment, only one set up needs to be done-

  1. Cycle Count

Cycle Count

Follow the below steps to create a Cycle Count in Mobile Device-

  1. Navigate to:Warehouse Management > Set Up > Mobile Device > Mobile Device Menu Items.
  2. Click New to create a record.
  3. Select type as Work under Mode.
  4. In Directed by, select User Directed.
  5. Select the Generate License plate, Override target LP&  Allow Splitting of Work check box checked.

1

Mobile Device Menu 

Once the Mobile device menu items has been created, its time to attach these Menu items into the menu.

Navigate to: Warehouse Management > Set Up > Mobile Device > Mobile Device Menu.

Click New and enter the name as Cycle Counting. Under cycle counting ,move these menu items from right to left (Cycle Count). So these items will be displayed at the time of log in.

1

 Work User

User needs to create a Work user so that he/she can able to log in to mobile device and process the work. Make sure to check the ‘Is Cycle count Supervisor’ check box checked.

1

Now we will do the Cycle count process. Follow the below steps for the same:

  1. Navigate to Warehouse Management > Periodic > Cycle count work by Location.
  2. Click Select button to open the query form.

1

3. Once OK is clicked, Location & Warehouse will come into main form.

4. Click OK to run the cycle count and Cycle count work will get created.

1

5. Now navigate to : Warehouse Management > Common > Work > Open cycle count Work and copy the Work ID.

1

6. Log in to the mobile device and click Cycle Counting > Cycle Count

1

7. Enter the Work ID and click OK to continue

1

8. Enter the Item number and then click OK.

1

9. Enter the number of quantity in the Quantity field and click Finished.

1

10. Click OK to continue. Enter the LP number which will be get from the Item’s on hand.

1

11. Click OK and now click to Finish.

1

12. Work will get completed.

1

12. After the completion of the work, navigate to: Warehouse Management > Common > Work > Closed cycle count Work and then click Cycle Count button to see the result.

1

13. System has created all the Cycle counting transactions along with the journal numbers.

1

14. Navigate to Inventory Management > Journals > Item Counting > Counting. Drag to Posted and then click on lines to see the counted transaction.

1

This is the way by which counting journal can be processed by using the WMS feature. In my next blog I will be back with some other interesting feature. Till then Keep DAXing 🙂 🙂 🙂

Warehouse Management System- Replenishment Process

Hi All,

These days I am finding a lot of views on my blog from across the world. First of all, thanks to all of you for visiting my blog. If you have any concern or any doubt then please don’t hesitate to write me. Please give your feedback in the comments too. As these days since we are discussing about the WMS processes, today lets discuss on the Replenishment Process.

Replenishment is a process of transferring the materials from Bulk Locations to Pick Locations. Bulk is the location where items are being stored during the inbound process. Whereas Pick is the location from where items are being picked for the outbound process.

There are few set ups required for the replenishment process. Below points will describe the same.

Work Templates

A work template is used to create and process warehouse work at various stages in the warehouse management process.

For setting up a Work Template for a Replenishment Process, follow the below steps:

  1. Navigate to: Warehouse Management > Set Up > Work > Work templates.
  2. Select the Work Order type of the Work Template form as Replenishment. Click New to create a new record.
  3. In the Lines create two records having the work type one for PICK and another for PUT.
  4. Click Edit Query at the header to specify the Warehouse.

1

Replenishment Templates

Replenishment Template is a logical grouping of the sets of rules used to replenish inventory. By using multiple replenishment templates, you can choose when and how often groups of items and locations will be evaluated for replenishment.

For setting up a Replenishment Template for the Replenishment Process, follow the below steps:

  1. Navigate to:  Warehouse Management Set Up > Replenishment > Replenishment templates.
  2. Click New to create the record. Enter the Replenishment template name and description.
  3. Under the Replenishment Template Lines enter the minimum quantity and maximum quantity.

1

Note: In this case we have given the minimum quantity as 10 and maximum as 50.

4. On the Menu, click Select Product. Select the item that you need to replenish.

1

5. On the Menu, click Select Locations. Select the location you need to replenish.

1

Location Directives

Location Directives are used to direct work transactions to the appropriate location in the warehouse.

For setting up a Location Directive for a Replenishment process, follow the below steps:

For PICK

  1. Navigate to: Warehouse Management > Set Up > Location Directives
  2. Select the Work Order type of the Location Directive form as Replenishment. Click New to create a record and select the Work type as Pick.
  3. Enter the Site and Warehouse for the Pick.
  4. Under the Lines fast tab enter the From and To quantity that will be valid for.
  5. Create a record in the Location Directive Actions fast tab and click Edit query. Under Edit query, enter the Location Profile ID from where the items will be Picked from. So the items in this case will be picked from the BULK Location.

1

For PUT

  1. In the same form, Click New to create a record and select the Work type as Put.
  2. Enter the Site and Warehouse for the Put.
  3. Under the Lines fast tab enter the From and To quantity that will be valid for.
  4. Create a record in the Location Directive Actions fast tab and click Edit query. Under Edit query, enter the Location Profile ID where the items will be PUT. So the items in this case will be PUT to the PICK Location.

1

On-Hand View

In the On-hand screen, the bulk location has lots of quantity. But in the Pick Location, there is only 5 quantity in the PA-01-1-1. Since in the Replenishment template we have defined 10 quantity as the minimum quantity, so after running the replenishment process, it will work.

1

Mobile Device Menu Items

Mobile device needs to be set for the particular user so that the user can use his/her mobile device to perform the work For Replenishment, only one set up needs to be done-

  1. Replenishment

Replenishment

Follow the below steps to create a Replenishment process in Mobile Device-

  1. Navigate to:Warehouse Management > Set Up > Mobile Device > Mobile Device Menu Items.
  2. Click New to create a record.
  3. Select type as Work under Mode.
  4. In Directed by, select System Directed.
  5. Select the Generate License plate, Override target LP&  Allow Splitting of Work check box checked.

1

Mobile Device Menu 

Once the Mobile device menu items has been created, its time to attach these Menu items into the menu.

Navigate to: Warehouse Management > Set Up > Mobile Device > Mobile Device Menu.

Click New and enter the name as Replenishment. Under Replenishment,move these menu items from right to left (Replenishment). So these items will be displayed at the time of log in.

1

And later select this Replenishment into the Main Menu (As already shown in the Inbound and Outbound Process)

Replenishment Process

Follow the steps to run the Replenishment process-

  1. To generate replenishment, follow this navigation path: Warehouse Management > Periodic > Replenishment.
  2. Select the query form to select the Replenishment Template.

1

3. Click OK to Run the Replenishment.

4. Work for Replenishment will get created.

1

5. Navigate to: Warehouse Management Common > Work > Open replenishment Work

1

 Note: Since the Minimum quantity was 10 and maximum quantity in the Replenishment template is 50. And in the On-hand it was 5 quantity. So system has created the replenishment for the 45 quantity.

6. Log in to the mobile device and click Inventory > Replenishment

1

7. System will automatically detect the Location and will ask to enter the LP manually. From the On-hand form, get the LP number.

1

8. Upon clicking OK, system will take the Target LP automatically.

1

9. Items will be but into the Picking Locations.

1

10. Work gets completed.

1

11. Coming to the on-hand screen to check, the quantity in the Pick location has been raised to 50 from 5 quantity.

1

So this is the process by which items are being moved from one location to another location in a warehouse. Hope that this post must help for those who work under such requirements. In my next post I will start up with the Cycle Count process in WMS. Till then Keep DAXing 🙂 🙂 🙂

Warehouse Management System- Outbound Process

Hi DAXers,

As promised in my last post of Inbound process, I am back with the Outbound process now. Outbound process is nothing but the normal Sales Order process which we will achieve now through the WMS.

Like Inbound process, we have few more set ups in Outbound Process also like Location Directives, Work Template, Wave Template and Mobile Device Menu Items which we will learn to configure in this post.

Location Directives

Location Directives are used to direct work transactions to the appropriate location in the warehouse. For example, in a Sales order transaction, a location directive determines where the items will be picked from and where the picked items will be put.

User can use location directives to do the following:

  • Put away incoming items.
  • Pick and stage items for outbound transactions.
  • Pick and put raw materials for production.
  • Replenish locations.

For setting up a Location Directive for a Sales Order, follow the below steps:

For PICK

  1. Navigate to: Warehouse Management > Set Up > Location Directives
  2. Select the Work Order type of the Location Directive form as Sales Order. Click New to create a record and select the Work type as Pick.
  3. Enter the Site and Warehouse for the Pick.
  4. Under the Lines fast tab enter the From and To quantity that will be valid for.
  5. Create a record in the Location Directive Actions fast tab and click Edit query. Under Edit query, enter the Location Profile ID from where the items will be Picked from. So the items in this case will be picked from the PICK Location.

1

For PUT

  1. In the same form, Click New to create a record and select the Work type as Put.
  2. Enter the Site and Warehouse for the Put.
  3. Under the Lines fast tab enter the From and To quantity that will be valid for.
  4. Create a record in the Location Directive Actions fast tab and click Edit query. Under Edit query, enter the Location Profile ID where the items will be PUT. So the items in this case will be PUT to the CONVEYOR Location.

1

So in short, while the orders will be processed, this Location Directive will give a location from where the items will be Picked and the Location where to PUT.

Work Templates

A work template is used to create and process warehouse work at various stages in the warehouse management process. . For example, a sales order has been initiated, so a work item must be created for somebody to go and pick items from the defaulted receiving location and follow the location directive action to pick the item and to put the item away in a particular location.

User can use Work Templates to do the following:

  • Outbound transactions.
  • Picking of inventory items.
  • Production tasks such as picking or putting of raw materials.
  • Inventory transfers.
  • Movement of inventory items between locations.
  • Replenishment of locations.

For setting up a Work Template for a Purchase Order, follow the below steps:

  1. Navigate to: Warehouse Management > Set Up > Work > Work templates.
  2. Select the Work Order type of the Work Template form as Sales Order. Click New to create a new record.
  3. In the Lines create two records having the work type one for PICK and another for PUT.
  4. Click Edit Query at the header to specify the Warehouse.

1

Wave Template

Wave templates are being used as a wave processing to group picking work for multiple work orders into a single wave.

This process describes to create, process, and release a wave to create picking work for a load, shipment, production order, or Kanban order. You can create waves for sales orders

  • Sales orders – Use shipping waves to include lines from sales orders. When a sales order is released to the warehouse, the sales order lines can be included in the wave.

For setting up a Wave Template for a Sales Order, follow the below steps:

  1. Navigate to: Warehouse Management > Set Up > Wave > Wave templates.
  2. Select the Wave Template type as Shipping. Click New to create a new record and enter a Wave name, Site and Warehouse.
  3. Click the check boxes- ‘Automatic Wave Creation’, ‘Process Wave at Release to Warehouse’ and ‘Automate Wave Release’.

1

4. Make sure that you have selected All the Methods by selecting them from Right to             Left.

1

Mobile Device Menu Items

Mobile device needs to be set for the particular user so that the user can use his/her mobile device to perform the work For Outbound, only one set up needs to be done-

  1. Sales Picking

Sales Picking

Follow the below steps to create a Sales Picking in Mobile Device-

  1. Navigate to:Warehouse Management > Set Up > Mobile Device > Mobile Device Menu Items.
  2. Click New to create a record.
  3. Select type as Work under Mode.
  4. In Directed by, select user directed.
  5. Select the Pick & Pack,Generate License plate, Override target LP&  Allow Splitting of Work check box checked.

1

Mobile Device Menu 

Once the Mobile device menu items has been created, its time to attach these Menu items into the menu.

Navigate to: Warehouse Management > Set Up > Mobile Device > Mobile Device Menu.

Click New and enter the name as Outbound. Under Outbound,move these menu items from right to left (Sales Picking). So these items will be displayed at the time of log in.

1

And Later, select this Outbound into the Main Menu.

1

Now we are done up with all the set ups that are needed for the Outbound process. Now it’s time to process the Sales order by WMS.

Follow the below steps for the Inbound Process-

  1. Create a Sales Order. Make sure that you have taken the Item as advanced warehouse item and warehouse as advanced warehouse.

1

2. Click Inventory > Reservation to reserve the items. Under Reservation form, click            Reserve lot to reserve the items.

1

3. Navigate to Warehouse Management tab of the sales order and then click ‘Release to Warehouse’ button.

1

4. Release to Warehouse leads to the creation of – Wave ID, Work ID and Shipment ID.

1

5. Navigating to the sales order to get the Work ID that has been created.

1 1

6. User will log into the Mobile device.

1

7. After Log in, user needs to click on the Outbound Button.

1

8. Click on Sales Picking to proceed.

1

9. Scan with the Work ID that has been generated.

1

10. System will automatically take the Location. At this time, system will ask for a License Plate to enter. Take the LP from the Item’s on-hand form.

1

1

11. System will take the Target LP automatically.

1

12. Click Done to Continue.

1

13. System will ask to scan a Location. Enter Conveyor01 (This is one of the location I made manually in the Locations form under the Location Profile ID as Conveyor) to it and Click OK.

1

14. Click OK to complete the Work.

1

15. Now navigate to the same work details. The status of the work gets closed.

1

16. Since the item is a serialized item, so need to enter the serial number. Go to the Lines tab of the Packing Slip form and click Register Serial number.

1

17. Enter the serial numbers manually by entering them and clicking Enter. By this way fill all the serial numbers.

1

Once the Serial numbers has been entered, user can do the Packing Slip.

I believe that this post will help you about learning the Outbound Process by WMS. In my next post I will start up with some other functionality in WMS. Till then Stay Tuned 🙂 🙂 🙂

Warehouse Management System- Inbound Process

Hi All,

We have already started the Warehouse Management System (WMS) Process in AX 2012 R3 from my last post where we have seen the basic set ups & configurations. Now we will continue with it and will go ahead. Today in this post we will discuss about the Inbound process. Inbound process is nothing but the normal Purchase Order process which we will achieve now through the WMS. Warehouse Management System is also sometimes called as the Mobile Device Scanning process because we will now process the purchase order through mobile device or scan gun.

We have few more set ups to be done like Location Directives, Work Template and Mobile Device Menu Items which we will learn to configure in this post.

For the basic set up and configuration (as in my last post), you can check from here and then proceed.

Location Directives

Location Directives are used to direct work transactions to the appropriate location in the warehouse. For example, in a purchase order transaction, a location directive determines where the items will be picked and where the picked items will be put.

User can use location directives to do the following:

  • Receive the incoming items.
  • Pick and put items for inbound transactions.
  • Pick and put raw materials for production.
  • Replenish locations.

For setting up a Location Directive for a Purchase Order, follow the below steps:

For PICK

  1. Navigate to: Warehouse Management > Set Up > Location Directives
  2. Select the Work Order type of the Location Directive form as Purchase Order. Click New to create a record and select the Work type as Pick.
  3. Enter the Site and Warehouse for the Pick.
  4. Under the Lines fast tab enter the From and To quantity that will be valid for.
  5. Create a record in the Location Directive Actions fast tab and click Edit query. Under Edit query, enter the Location Profile ID from where the items will be Picked from. So the items in this case will be picked from the RECV Location.

Untitled

For PUT

  1. In the same form, Click New to create a record and select the Work type as Put.
  2. Enter the Site and Warehouse for the Put.
  3. Under the Lines fast tab enter the From and To quantity that will be valid for.
  4. Create a record in the Location Directive Actions fast tab and click Edit query. Under Edit query, enter the Location Profile ID where the items will be PUT. So the items in this case will be PUT to the BULK Location.

Untitled

So in short, while the orders will be processed, this Location Directive will give a location from where the items will be Picked and the Location where to PUT.

Work Templates

A work template is used to create and process warehouse work at various stages in the warehouse management process. For example, a purchase order has been received, so a work item must be created for somebody to go and pick items from the defaulted receiving dock and follow the location directive action to put the item away in a particular location.

User can use Work Templates to do the following:

  • Inbound transactions.
  • Picking of inventory items.
  • Production tasks such as picking or putting of raw materials.
  • Inventory transfers.
  • Movement of inventory items between locations.
  • Replenishment of locations.

For setting up a Work Template for a Purchase Order, follow the below steps:

  1. Navigate to: Warehouse Management > Set Up > Work > Work templates.
  2. Select the Work Order type of the Work Template form as Purchase Order. Click New to create a new record.
  3. In the Lines create two records having the work type one for PICK and another for PUT.
  4. Click Edit Query at the header to specify the Warehouse.

Untitled

Note: Work Class IDs are basically the Location types defined while processing the particular Work. This is the place where system will validate or match the Locations for particular process. Navigate to: Warehouse Management > Set Up > Work > Work classes.

1

Mobile Device Menu Items

Mobile device needs to be set for the particular user so that the user can use his/her mobile device to perform the work For Inbound, two set up needs to be done-

  1. Purchase Receive
  2. Purchase Put- Away

Purchase Receive

Follow the below steps to create a Purchase Receive in Mobile Device-

  1. Navigate to:Warehouse Management > Set Up > Mobile Device > Mobile Device Menu Items.
  2. Click New to create a record.
  3. Select type as Work under Mode.
  4. Select Purchase Order Item Receiving under Work Creation Process.
  5. Select the Generate LP check box checked.

1

Purchase Put Away

Follow the below steps to create a Purchase Receive in Mobile Device-

  1. Navigate to:Warehouse Management > Set Up > Mobile Device > Mobile Device Menu Items.
  2. Click New to create a record.
  3. Select type as Work under Mode.
  4. In Directed by, select user grouping.
  5. Select the Generate License plate, Override target LP&  Allow Splitting of Work check box checked.

1

Mobile Device Menu 

Once the Mobile device menu items has been created, its time to attach these Menu items into the menu.

Navigate to: Warehouse Management > Set Up > Mobile Device > Mobile Device Menu.

Click New and enter the name as Inbound. Under Inbound,move these menu items from right to left (Purchase Receive and Purchase Put Away). So these items will be displayed at the time log in.

1

And Later, select this Inbound into the Main Menu.

1

Set the User ID and Password for the Worker

To scan and process the orders, user needs to log into the mobile device. User or worker needs to set up the log in configuration.

Follow the below steps to set the User ID and password :

  1. Navigate to: Warehouse Management > Set up > Work Users > Worker.
  2. Click New and select the Worker.
  3. Under Users fast tab, add a User ID.
  4. Once User ID is set, try to save the record. Upon saving, a pop up will come which will ask to set the password.

1

5. Click Set Password.

1

Now we are done up with all the set ups that are needed for the Inbound process. Now it’s time to process the purchase order by WMS.

Follow the below steps for the Inbound Process-

  1. Create a Purchase Order. Make sure that you have taken the Item as advanced warehouse item and warehouse as advanced warehouse.

1

2.  Copy the Purchase Order number and open the Form > WHSWorkExcecute from AOT.

1

3. While opening the WHSWorkExcecute, the login window will appear where user needs to enter the UserID and password (As per the set up)

1

4. After Log in, user needs to click on the Inbound Button.

1

5. Click on Purchase Receive to proceed.

1

6. Scan with the Purchase Order number and Item number. Scan with the Quantity number.

1

7. Click OK to proceed. At this time, the work gets completed.

1

8. Coming to the Purchase Order to view the Work Details.

1

Work details has been created with the Work ID.

1

9. At this time items has been received and now needs to PUT. User will again go back to the Mobile Device and click the Purchase Put Away-

1

10. Scan with the Work ID. Copy the Work ID from the Purchase Order.

1

11. Click OK to proceed. At this time, system shows a Pick location as RECV.

1

12. Click Done to Complete.

1

13.  At this time system will show the PUT location as BA-01-1-1. System is taking this location in PUT because in the Location Directives, the default location for Purchase PUT is given as BULK.

1

14. Click Ok and the Work will get completed.

1

15. Now navigate to the same work details. The status of the work gets closed.

1

So, this is the complete Inbound Process by WMS. Next user can confirm the order and do the product receipt.

Hope this post will help you in learning and understanding the Inbound process by WMS. In my next post, I will start up with the Outbound Process in WMS. Till then keep DAXing. 🙂 🙂 🙂

Warehouse Management System in AX 2012-Set Up & Configuration

Hi All,

As promised in my last post, I am back with WMS feature in AX 2012 R3. This is very interesting  and absolutely a new module that has been added to AX 2012 R3 whose purpose is basically to monitor and automate warehouse processes. WMS in AX is an Advanced distribution which provides complete real time and global view in the business efficiently.

Warehouse Management for Microsoft Dynamics AX is an integrated warehousing solution for advanced distribution and order fulfillment that adds to the current capabilities of Microsoft Dynamics AX to support distribution companies and logistics providers.

Overview of Features:

  • You can configure inbound and outbound intelligent workflows.
  • You can assign orders to clusters to pick from a single location, and configure profiles to control the validation and packing of items into shipping containers.
  • You can create, implement, and release work by using batch-scheduled or manual processing of waves.
  • You can set up cycle counting thresholds, create and  schedule counting plans, and cycle count locations and items.
  • You can set up container groups to order the sequence of the packing process, and create templates to support packing strategies.
  • You can use scanners or other mobile devices to optimize precision in the picking and put-away processes.

Before going for the processes like Inbound, Outbound, Cycle Count etc, we first need to configure few set ups. These include-

  1. Storage Dimension Group Set up
  2. Tracking Dimension Group set up
  3. Warehouse Set up.
  4. Reservation Hierarchy.
  5. Item Set up.
  6. Location Type
  7. Location Formats
  8. Location Profiles
  9. Location Set Up Wizard

Let’s discuss each of them in details. So in this post I will discuss about the set ups that are needed to start any WMS processes.

Storage Dimension Group Set Up

Storage Dimension groups help the way to control items that are stored and taken from inventory. These include extra of-

  • Use Warehouse Management Process.
  • Inventory Status
  • License Plate

Navigate to : Product Information Management > Setup > Dimension Groups > Storage Dimension Group

Untitled

Note: When “Use Warehouse Management Process” parameter is selected, it enables Inventory Status and License plate.

Untitled

Tracking Dimension Group Set up

Tracking Dimension groups help the way to track the items that are stored and taken from inventory. These include extra of-

  • Active in Sales Process

Navigate to:Product Information Management > Setup > Dimension Groups > Tracking Dimension Group

Untitled

Untitled

Warehouse Set Up

In order to use warehouse management,you need to create a warehouse and enable the warehouse management process.

Navigate to: Warehouse Management > Set up > Warehouse Set up > Warehouses

Under the Warehouse Management fast tab check the “Use Warehouse Management Process” check box. This will make the warehouse as the advanced warehouse.

NOTE: You needs to check this check box first and then need to save the record.

Untitled

Untitled

Reservation Hierarchy 

A reservation hierarchy is used to defer reservation details beyond the point in the ordering process where you enter the order. For example > When goods are sold, inventory must be reserved to fill the orders. This reservation process will follow the rules of your reservation hierarchy.

Navigate To: Warehouse Management > Setup > Inventory > Reservation hierarchy

Untitled

Item Set Up

Item creation is same as you used to do in AX 2012 R2. Attaching the Storage Dimension Group, Tracking Dimension group and Reservation Hierarchy (that we have created now) will make the item as Advanced Warehouse item.

Untitled

Once these have been attached, next go to the Warehouse Management fast tab and enter a unit sequence group ID.

Untitled

Note: The unit sequence group defines the sequence of units that can be used in warehouse operations. The sequence determines the order of units in which warehouse work is generated and it is applied when work is created for quantities on a purchase order line or transfer order line.

Location Type

Location types are used to describe or define the locations that the warehouse will be using.

Navigate to: Warehouse Management > Set up > Warehouse Set up > Location Types.

Untitled

Location Formats

Location formats leads the users to define what the numbering system for the warehouse will be. These can have a unique format, depending on whether the user uses Aisles, Racks, Bins, Shelf, or whatever the structure resembles.

Navigate to: Warehouse Management > Set up > Warehouse Set up > Location Formats.

Untitled

Location Profiles

Location Profile lets the user to specify whether a particular warehouse location is license plate controlled, whether it can be cycle counted, and whether it allows for mixing of inventory batches.

  • Select Use license plate tracking.
  • Select Allow mixed items.
  • Select Allow mixed inventory status

Untitled

Location Set Up Wizard

The Location Setup wizard lets you create locations based on the formats that were previously defined. The process of creating the locations is simple

Navigate to: Warehouse Management > Set up > Warehouse Set up > Location Set Up Wizard.

Untitled

  • Select the respective Warehouse for which you want to create the locations.
  • Select the Location Profile ID i.e. BULK or PICK
  • Select the format of the Location.
  • Once done click Build.

System will create all the Location names by permutation and combination.

Untitled

In this similar way, other locations like PICK, CONVEYOR, BAYDOOR, USER and RECV needs to be Build.

This is the basic steps for the WMS processing. Without these steps we can’t move forward for any processes like Inbound, Outbound. In my next post I will start discussing about the Inbound, Outbound processes. I believe that this post must be helpful for those who have started the WMS feature. Till then keep DAXing 🙂 🙂

Trade Allowance Management in AX 2012

Hi DAXers,

As these days we are discussing about the new features in AX 2012 R3, so in this post I am back with another new feature in AX 2012 R3. Today in this post we will discuss about the Trade Allowance Management in AX 2012.

Trade Allowance Management are basically a discount offered by Vendors to Distributors as a part of promotional incentives. Its objective is to effect a lower retail price to stimulate sales.
Example > Suppose a manufacture sells to a retailer at a certain price unit point and beyond that point you give them a discount because they are buying in bulk. For instance, hairdressers can go to the manufacturer to get a discount for buying in bulk. They can get shampoos and other hair products at a cheaper rate and sell them to consumers at full prices. Manufacturers with the best trade allowances will get the best displays in the hair salon.

Trade Allowance Parameter

Before we create Trade Allowance funds or Trade allowance Agreements, we first need to define the Trade Allowance Management. This is the place where we define Customer Hierarchy, Procurement Category, Lump Sum Expense account etc.

Click Trade Allowance Management > Setup > Trade Allowance Management Parameters.

Rebate

Customer Category Hierarchy 

You need a Customer category hierarchy to group the customers that have similar characteristics, such as region or line of business.

Click Trade allowance management > Setup > Customer Category Hierarchy

Rebate

By clicking Add/Remove customers, you can add the customers or also remove them.

Rebate

Product Category Hierarchy

Along with the customer, a Product Category Hierarchy is also needed for the set up. I believe that all of you know to create a Product Category Hierarchy and assign the items on it. So I am not spending much time on it.

Optional Set Ups

There are few optional set ups needs to be done. These include- Fund usage, Marketing Objective, Trade Allowance Agreement Period and Merchandising Event Category.

  i) Fund Usage

Funds define an amount of money which can be allocated for trade allowances. Click Trade Allowance Agreement > Set up > Fund Usage.

Rebate

  ii) Marketing Objective

This basically explains of the promotions and sales that are offered by your organization. Click Trade Allowance Agreement > Set up > Marketing Objectives.

Rebate

 iii) Trade Allowance Agreement Period

Trade allowance agreement periods are used as a time frame that identifies the date ranges that need to be met to qualify for the trade allowance.Click Trade Allowance Agreement > Set up > Trade Allowance Agreement Period.

Rebate

  iv) Merchandising Event Category

Merchandising event categories are used on the trade allowance line. Their purpose is to compare similar types of promotions during the analysis phase.

Default Type:

  • Bill-back:  Bill-back merchandising events are used for trade allowances where reimbursement is given after purchase.
  • Lump sum:  Lump sum promotions are larger amounts of payment delivered after a service is completed.
  • Off-invoice:  Off-invoice merchandising events are taken at the time of order and automatically deducted before the customer makes a payment.  No reimbursement is necessary.

Rebate

Funds for Trade Allowance

Funds define an amount of money which can be allocated or used for trade allowances. Funds can be distributed among various trade allowances.

i) Click Trade allowance management > Periodic > Funds.

ii) Enter an amount in the Fund Budget.

iii) Enter the from date and To date up to which this fund will be utilized.

iv) Under the customer fast tab, select the customer hierarchy and select the respective customer.

Rebate

v) Under the Items fast tab, click Add Products in order to add the items.

Rebate

In the Add products window you can select the product Hierarchy and insert from the Available products section. Select the respective Product Hierarchy and then the items attached to the hierarchy will be shown in the Available Products pane. Click Add and then OK to add the products.

Rebate

Once OK is clicked, products will be shown in the Items fast tab of the Fund form.

vi) Once all the fields has been entered, change manually the Status of the Fund as Approved.

Rebate

Trade Allowance Template

Templates are used to create Trade Allowance funds that are based on a predefined set of values.

i) Click Trade Allowance Management > Periodic > Templates.

ii) Create new and enter the fields like description, Marketing objectives, Trade Allowance Agreement period, unit, Base unit, Lift Percent etc. Under the customer fast tab, select the respective customers attached with the Customer Hierarchy.

Rebate

iii) Under the Items fast tab, click Add product and select the Procurement Category. Items attached with it needs to be added by clicking OK.

Rebate

iv) Under the Funds fast tab of the Header view click Add line, and select the respective fund that we have created now.

Rebate

v) Under the Line view, under the Merchandising Event tab, click Add line and select one category. In this case I have selected- Bill Back.

Rebate

vi) Define the From qty, To qty and Value under the Amounts tab of the Trade Allowance Lines. In our example the from qty is 1 and to qty is 30. That means when a Sales Order is created with the specific customer (here customer means the distributors) and item, then a rebate of 30 will be given.

Rebate

Trade Allowance Agreement

Now we have done up with all the set ups. Now its time to create a Trade Allowance Agreement.

i) Click Trade Allowance Management > Common > Trade Allowance Agreement.

ii) Create an agreement and enter the same values that we have defined in the Trade Allowance Template.

iii) Once all the details are filled in, click Confirm button. This will confirm this agreement and this agreement will come into action.

Rebate

iv) Once the Confirmed button is clicked, the status changes to Confirmed and a Trade Allowance cost will come automatically calculated by the system.

Rebate

Once all these set up has been done, its time to see the impact of the Trade Allowance Agreement. To do so, we need to create a Sales Order taking same customer 004018 (i.e. the distributor) and same item 0011.

Rebate

Now clicking the Sales Order Line > Price Details

Rebate

Under the Rebates fast tab, a rebate of 300 has been initiated. The calculation is that we have defined for per item the discount is 30 so for 10 quantities the amount is 300 USD.

Rebate

The sales order needs to be invoiced. After the order gets Invoiced, Voucher Journal gets posted.

Rebate

Since we have given Bill Back as the set up in the Merchandise Event, so a reimbursement needs to be done.

Rebate Payment

Select the respective customer and click Collect tab > Settle Open Transaction > Function > Bill Back Program 

Rebate

Under the rebate form, mark the transaction. As in our case it is 300 USD.

Rebate

After Marking the transaction, click Functions > Create Credit Note

Rebate

Voucher will get posted.

Rebate

So upon the posting, an amount of -300 USD has been initiated for this respective customer which needs to be settle during further transaction.

Rebate

So the distributor who is basically the customer for the vendor ( who are promoting the products for more sale), gets a rebate upon 10 quantities as a part of promotional incentives in order to increase the sales.

I believe that this post will help you. In my next post, I will start up with the Warehouse Management System (WMS) module (Advanced Warehouse Management), another new feature of AX 2012 R3. See you. Stay Tuned 🙂 🙂 🙂